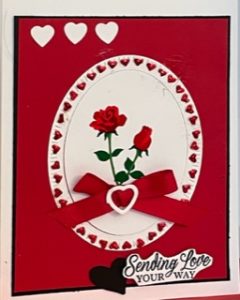
 I love the end result of this card but I admit it took more time than usual to make. I also used many items from my stash. As always this card as any can be revised to use your similiar crafting supplies. I will llist supploies anditem numbers below for your shopping ease.
To make this card you will need:
- 8-1/2″X11″ sheet of Basic White cardstock (#159276)
- A 3″X3″ piece of Basic White cardstock (#159276)
- A 3-3/4X5″ piece of Real Red cardstock (#102482)
- A 4″X5-1/4″ piece of Basic Black cardstock (#121045)
- 15″ Real Red ribbon (#156323)
- Scissors (#103579)
- Paper Trimmer (#152392)
- Liquid Glue (#110755)
- Framed Florets Dies (#150623)
- Love For You Dies (#160403)
- Any sentiment you choose to adhere to your card. I used a stamp from an old Paper Pumkin kit.
- Cut and Emboss machine (#149653)
- Floral ephemera. I used some rose stickers from my stash
- Bone folder (#102300)
- Glue dots (#103683)
- Country Bouquet Punch (160382)
- A scrap of Basic Black cardstock
- Dimensionals (#144430)
Lets get started.
- Cut and score your A2 card base. Place your 8-1/2″X11″ sheet of Basic White cardstock in your trimmer. Place so that one of the 11″ sides is at the top of trimmer. Cut at the 5-1/2″ mark. (You have cut the cardstock in 1/2.)
- Place one of the 5-1/2″X8-1/2 ” pieces of Basick white cardstock in either your scoreboard or your Stampin’ Up trimmer. You need the 8-1/2 side to be facing upward. Now score at 4-1/4 “. Fold at score line and with your bone folder crisp the fold.
- Now get ready to die cut. Using the Framed Floret dies use the oval frame that has the heart shaped cut outs around the oval. With your cut and emboss machine cut the oval out of the 3″X3″ piece of Basic White. cardstock. You will have the outer frame and the inside oval. I used both.
- Using the heart shaped die from the Love For You die set cut out three small hearts out of a scrap of Basic White cardstock.
- With the Country Bouquet punch make a small heart from a scrap of Basic Black cardstock.
- Stamp your sentiment on a scrap of Basic White cardstock. Then cut out the stamped sentiment.
- Make your bow out of real red ribbon.
Now lets put everything together:
- With the liquid glue adhere the Real Red cardstock layer onto the Basic Black cardstock layer, leaving a thin margin all around.
- With the liquid glue adhere the two layers you created onto the front of your card base. I made a card in portriat orientation.
- Adhere the white frame (that has the heart shaped cut outs) in the middle of the front of the cards. You will see the red color from the card layer show through the heart shapes on the frame.
- Adhere the white oval inside the heart shaped frame.
- Now adhere your floral ephemere in the middle of the oval.
- Place a glue dot on the bacl of your bow and place under the floral ephemera.
- Adhere your sentiment to the bottom right side of the card using dimensionals.
- Adhere a small black heart that you made withthe Love for You punch next to the sentiment.
- At the upper left-hand side of the card adhere the three heart shapes.
- I made a heart shape from the remaining white cardstock whe I die cut the white heart shapes and adhered that to the middle of the bow. This is clearly optional.
- Dont forget to decorate the envelope and stamp or write a personal message inside your card.


