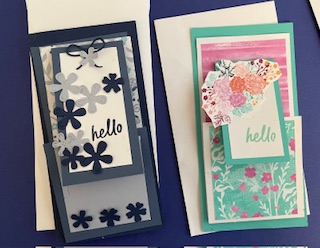
I love a mini slimline card and I am always intrigued by fun folds. It’s no surprise that I would like this mini slimline. Often I like to customize the envelopes I send my slimline cards in. Below is a list of materials needed to recreate the slimline and an envelope.
You will need:
Two pieces of Basic White cardstock that neasire 1-1/2″ x 3″
A 2-1/2″ x 2″ piece of DSP Your choice- I used Countryside Ibb.
A 2-1/2″ x 3″ of Basic White cardstock.
A 3″ x 6″ piece of cardstock. I used Night of Navy.
A 2-3/4″ x 8″ coordinating cardstock . Score at 3″. I used Misty Moonlight
A 2-1/2″ x 5-1/4″ piece of coordinating DSP. I used Countryside inn.
Night of Navy Ink.
Scraps of Night of Navy so you can die cut flowere
Scraps of the DSP or BoHo cardstock so that youu cant cut flowere
Glue Dots
Take a pick tool.
Paper trimmer
Bonefolder
Liquid Glue
“Country Birdhouse” stamp set and dies
“Simply Said”stamp set
“Happy Little Things” stamp set.
For the envelope you need:
A piece of cardstock, DSP or even printer paper that measures 7-1/2″ x 8-1/2″.
A score board ot trimmer.
Bone folder.
Pencil – opt
Tear & Tape
Scissors.
To make the envelope
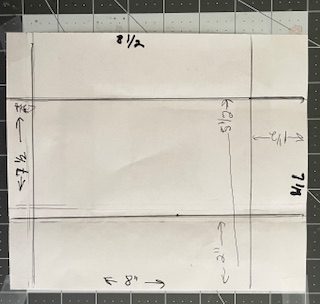
Cut your cardstock, DSP, vellum or printer paper to 7-1/2″ x 8-1/2″.
With the 7-1/2″ side facing upward on your printer or Simply Scored score at 2-3/8″
and at 5-1/2″ (Template indicates 2″ and 5-1/2 score lines but you need to score at 2-3/8 and 5-1/2).
Rotate so that the 8-1/2″ side is facing upward and score at 1-1/2″ and at 7-3/4″.
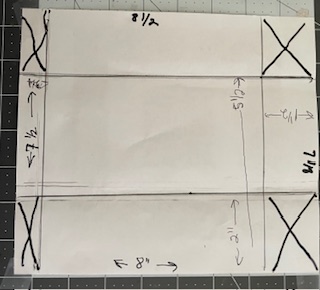
Fold on score lines and crisp those folds with your bone folder.
Then cut out the corner rectangles made by score lines. see template. The part you cut out is marked by
X
The 7-1/2″ side is the top and will become the top/opening of your envelope.
The 8-1/2 side will be the sides of your envelope. Fold these sides towardss the middle. One side will overlap. then on the side that doesn’t overlap place tear & tape.
Remove the release paper and adhere.
On the smallest tab that is at the bottom place a strip of tear & taoe. Remove the release paper and now your envelope is ready to be decorated and addressed.
After you have placed your card in the envelope place some more tear and tape on the remaining tab. Once you remove the rlease paper you are ready to seal your envelope and mail.