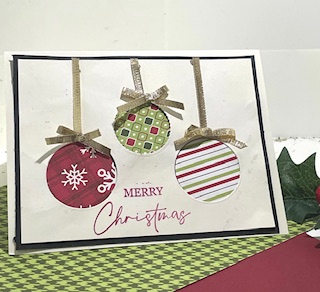
This card is simple to make and lends a sophisticated look.
I hope this card inspires you.
Here is what you need to make this card:
- One sheet of Basic White cardstock (#159276)
- One piece of Basic Black cardstock that measures 4″ x 5-1/4″ (#121045)
- Circle dies or punch (#162285)
- liquid glue (110452)
- trimmer (# 152392)
- Silicone Mat (#127853)
- bonefolder (#102300)
- Cut and Emboss Machine (#159971)
- Christmas classic stamp set (#161970)
- Cherry Cobble ink (#147083)
- Three pieces of Designer Series Paper measuring 2″ x 2″
- Gold Ribbon
To Make:
- Place one sheet of Basic White cardstock in the trimmer with the 11″ side facing upward. Cut in half at the 5-1/2″ mark.
- Rotate this Basic White cardstock you just cut so that the 8-1/2 ” side is facing upward. Score at 4-1/4″.
- Fold on score line.
- With your bonefolder crisp the fold.
- Cut the remaining piece of Basic White cardstock to a piece that measures 3-3/4″ x 5″
- With the 5″ side of the piece of Basic White cardstock facing upward, place your smallest circle and next size circle die on the piece of cardstock.
- Run through the emboss and cut machine.
- Then use the smallest die to cut a third circle to the right of one of the circles you previously cut.
- Now using the small and next size circle dies cut 3 circles out of your choice of Designer Series paper.
- At the bottom of this basic white layer stamp “Merry Christmas” using Cherry Cobbler ink.
- Then with a piece of tear & tape secure the cut DSP circles behind the holes that you have cut from the 3-3/4″ x 5″ piece of white cardstock.
- Now adhere the white layer with your filled circles onto the basic black layer. Be mindful to keep equal margins on all sides.
- Adhere both layers onto the front of your Basic White card base.
- Using gold ribbon adhere strips of ribbon to look like a hanging strip of the Christmas Decorations.
- Make three small bows and place them as desired.
This card fits in a medium-sized envelope.


