
Merry Christmas 2024
I realize that family stories fade after a few generations unless they are documented. Not only do I want my family’s story to carry on, but I also love sharing my family pictures. I want my grandchildren, great grandchildren, and great-great grandchildren to be able to know how my family celebrated with each other.
I love our family time together. Togetherness is a perfect time for a/some picture(s). These pictures not only document an event but offer a date or time stamp in our lives.
Because Christmas is such a great time to tell my family story, I try to record the memory in scrapbook form. And because I like to give scrapbooks as Christmas gifts, my Christmas photos are usually first in the next year’s scrapbook. So, the page layout I am sharing with you will be in 2024’s photo album.
The 2024 family scrapbook will house 8-1/2” x 11”pages. Here are the first two pages.
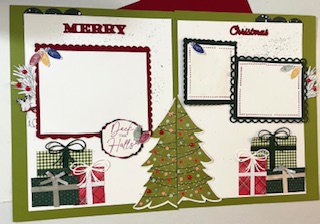
Here is what I used to create these two 8-1/2″ x 11″ scrapbook layouts:
- Two sheets of Old Olive Carstock https://www.stampinup.com/products/cardstock-8-1-2-x-11-old-olive?demoid=2242482
- Three sheets of Basic White cardstock. https://www.stampinup.com/products/basic-white-8-1-2-x-11-cardstock?demoid=2242482
- One sheet of Cherry Cobbler cardstock https://www.stampinup.com/products/basic-white-8-1-2-x-11-cardstock?demoid=2242482
- One sheet of Evening Evergreen cardstock. This cardstock has retired but you could easily substute Shaded Spruce cardstock.
- https://www.stampinup.com/products/cardstock-8-1-2-x-11-shaded-spruce?demoid=2242482
- Christmas Classic stamp set https://www.stampinup.com/products/christmas-classics-photopolymer-stamp-set-english?demoid=2242482
- Scallop Contour Dies https://www.stampinup.com/products/paper-trimmer?demoid=2242482
- Trimmer https://www.stampinup.com/products/paper-trimmer?demoid=2242482
- Cherry Cobbler ink. https://www.stampinup.com/products/classic-stampin-pad-cherry-cobbler?demoid=2242482
- Lable Me Lovely Punch which has retired but a great substute would be the Decoratice Circle punch https://www.stampinup.com/products/decorative-circle-punch?demoid=2242482
- liquid glue. https://www.stampinup.com/products/glue-liquid-multipurpose?demoid=2242482
- Silivone craft sheet. https://www.stampinup.com/products/craft-sheet-silicone?demoid=2242482
- Acrlic block used to hold stamp.
- scissors
- Two pieces of DSP that gives a Christmas feel I used a green plaid that measures 2-3/4″ x 1-3/4″
- Two pieces of red festive DSP that measures 1-1/4″ x 1-1/2″
- Two pieces of green print DSP that measure 2-3/4″ x 1-1/2″
How I created the pages
- First, I cut two sheets 8-1/2″ x 11″ of Basic White cardstock to measure 7-1/2″ x 10″. Each one of these sheets will be adhered to a sheet of the Old Olive cardstock measuring 8-1/2″ x 11″. When I adhered each sheet, I did so with the intentions that each sheet of white cardstock would have more narrow margins of Old Olive on the inner side of the page
- Then I cut an image of a Christmas Tree that I have saved from a previous Paper Pumpkin, in half. (I am aware that you may not have an image of a Christmas Tree like mine but, tree shapes are easy to cut out of green cardstock. This means you could cut your own and use some colorful gemstones or dots to decorate your tree.) I adhered each half of the tree on the bottom half of each page.
- I then cut the scraps of past Christmas Designer Series Paper (DSP) into the measurements above. I used strips of coordinating cardstock to make the piece look like gifts.
- Then I arranged the gifts on the bottom outer side of the page. You can arrange it however you like.
- I used a bow die to cut some of the ribbon shapes, but I also used actual ribbon to create small bows for the gifts. The real ribbons give texture to your page.
- I then used my Decorative Circle punch to punch out a white shape for my words.
- I also punched out two decorative circles out of Evening Evergreen cardstock. (Again, you could use Shaded Spruce cardstock).
- On the white circle I stamped the sentiment “Deck the Halls” in Cherry Cobbler Red ink. Of course, I used the Christmas Classics stamp set.
- I adhered the white stamped shape to one of the green punched shapes. Now I cut two shapes out of the green so that the green would be the bottom layer to the white. That means I glued one side of the white cardstock to one side of the green making sure there was a margin of green behind the white. Then I glued the second green decorative circle to the other side of the white stamped shape so that that side also had a margin of green poking out behind.
- I cut a 5″ x 5-3/4″ piece of Cherry Cobbler cardstock as the bottom layer of my photo mat. I did use the straight scalloped die from the scalloped contour dies to give this photo mate layer a scalloped edge.
- Then I adhered a 4-3/4″ x 5-1/2″ Piece of Basic White onto the Cherry Cobbler.
- I also used a previous stamp set to stamp different colored light bulbs to embellish.
- I used the pine bough stamp from the Christmas Classic stamp set and stamped on pieces of Basic White cardstock. Then I fussy cut them out and glued them in a cluster behind the photo mat.
- I also used an older die to cut out the words “Merry” and “Christmas”. But the Christmas Classic has a cute “Merry Christmas: stamp that you could stamp and fussy cut. This would offer a title to your page with some dimension.
- The second page is so similar to the first except one photo mat is layered with Evening Evergreen and Basic White cardstock.
- The journal section is also matted with the same green.
- Also, the Classic Christmas Stamp set has a stamp that resembles stitch marks and I used that to decorate the journal mat and the photo mat on the second page.
