
I love the Framed Florets Bundle! The oval dies are absolutly wonderful. I was so excited with this product that I have made many cards and I want to share this card with you.
If you want to re-create this card you will need:
- One 8-1/2” x 11” sheet of Basic Gray cardstock (item #121044). With the 11” side at the top of your trimer cut at 5-1/2”. Now you will have two pieces of 8-1/2” x 5-1/2” of Basic Gray cardstock. Now rotate so the 8-1/2” side is at the top and score at 4-1/2”. This will make your basic A2 size card.
- You will also need a medium envelope (item #159236).
- You will also need three pieces of Basic White cardstock (item # 159276) that measure 5-1/4” x 4” each. One of the pieces will be used for the inside of your card. The other piece will be die cut for the bottom layer on front of card. The third piece will be for the oval. You can put those aside for now.
- You will need a piece of Petal Pink cardstock (item #146985) that measures 3-1/2” x 4-1/2”Basic White cardstock.
- A 3” x 3” piece of Basic White cardstock
- A 2” circle punch or a circle die that will cut a 2” circle (item #151770-Layering Circle Dies).
- A strip of Evening Evergreen cardstock (item #155574) that measures 3-1/2” x 5”.
- You will need the Framed Floret Dies that are part of the Fitting Florets Collection
- You will also need the Framed Florets Stamp set from the Fitting Floret Collection.
- You will need Petal Pink Ink (item # 147108)
- The Gold Adhesive Backed Swirls from the Fitting Floret Collection.
- Adhesive of your preference. I used both the liquid Glue (item #140755) and Stamp & Seal Plus (item #149699).
- Dimensionals (item #104430)
- Cut and emboss machine (item #149653)
- A trimmer (item #152392)
- A bone folder (item #102300)
- Mini glue dots (item # 1036831)
- Scalloped Contour Dies (item #155560).
- Basic Gray ink (item #149165)
- Evening Evergreen ink (item #155560)
- A small piece of silver foil for the leave. If you don’t have silver foil you can choose Soft Succulent.
To make card:
- Let’s stamp! With your Basic Gray Ink stamp on a scrap piece of Basic White cardstock stamp three of the larger flowers and two of the smaller.
- With your petal pink ink and water painters watercolor the flowers. You could also use you alcohol blending markers if you have petal pink. Put the aside to dry.
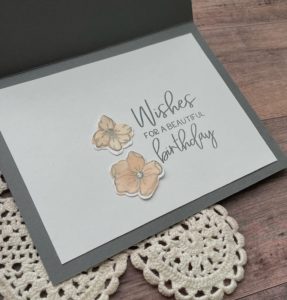
- From the Framed Florets stamp set you will want the stamp “Wishes for a beautiful birthday”. Then stamp that sentiment on one of the pieces of 5-1/4” x 4” basic white cardstock with the Evening Evergreen ink. Set aside.
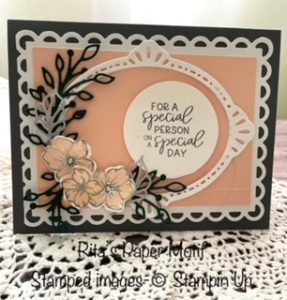
- With the evening Evergreen ink stamp the sentiment “For a special person on a special day” on the 2” circle. Set aside.
- With the petal pink ink you will want to stamp a flower on the envelope.
- With your die cutting and embossing machine die cut the largest rectangle of the Scalloped Contour dies out of another 5-1/4” x 4” piece of Basic White cardstock. Make sure all the little die cut pieces are out of the scalloped layer.
- With the largest oval die from the Framed Floret dies (this is the oval that has four decorative edges) using the die cutting and embossing machine cut the oval out of the third piece of 5-1/4” x 4” Basic White cardstock. I cut two of the ovals and glued them together. If you choose to do that you will need a fourth piece of 5-1/4” x 4” Basic White cardstock.
- With the spring die from the framed florets dies cut three sprigs out of the Evening Evergreen cardstock. Of course, you will use the die cutting and embossing machine.
- With the small leaf die cut two leave out of the silver foil. (Using the cutting and embossing machine.)
Now let’s assemble.
- Secure the score line on your card base. (Basic Gray)
- Adhere the inside panel that you stamped “Wishes for a beautiful birthday” to the inside of your card.
- Adhere one of the small flowers you colored by the stamped message.
- Now adhere the petal pink panel on the scalloped layer. Center as best as you can.
- Adhere the beautiful oval frame on the petal pink layer.
- Now adhere these layers on the front of your card.
- On the bottom corner (I chose the right hand corner but you could chose the left side if you want), adhere the two larger flowers leaving room for the small one. I used glue dots to adhere flowers so that I could tuck the sprigs underneath.
- With a dimensional adhere the smaller flower between the two larger flowers.
- You can now tuck the Evening Evergreen sprigs as you chose.
- Then tuck in the silver leaves.
- You are ready to adhere the sentiment you stamped on the circle. I used dimensionals.
- Finally, you can decorate with the gold swirls. I also used the White matte dots to add one more touch of white. You could skip this step or you could also use pearls if you have them.
Now you can share your card.
** You can purchase any of the items needed to make this card at my online store, just click the tab Shop Now and the shop now again. Then just type in the item number and you can purchase the product.** I definatley appreciate your business.
