
 Recipe Boards
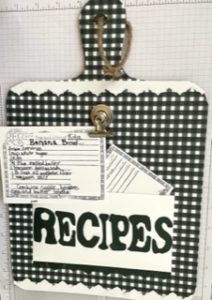
This recipe board adds an element to any kitchen decor.The materials and e,bellish the cutting board will dictate how it adds to kitchen decor..
It holds recipes so it also has a special function in the kichen as well.
How I made this recipe:
I found a wooden sign that was meant for Halloween.at the Dollar Store. The board looked like a cutting board so I put it in my basket. I also found in the stationary part of the Dollar Store a package of the metal clips.Those also went into the shopping basket.
When I arrived at home I took the board out and sanded the front because of the Halloween design. I also painted the board brown so it looked like dark wood. The sanding of the board was helpful but since I was going to cover the board I really didn’t need to paint the board.
I then laid the board down on the Designer Series Paper I was going to use. (I chose an Enening Evergreen plaid from the Framed Fl,orets Collectiojn.) Once I laid the board on the DSP I traced around the board to make two templates-one for the back of the board and one for the front. Then I used the liquid glue and adhered the DSP to the board.
While the glued paper was drying I used the Border Dies to cut two zig-zag boarders to embellesh the top and bottom of the board.
I also cut a piece of Basic White cardstock to measure 7-1/2″ x 4-1/2″. With the 7-1/2″ side at the top I sccored 1/2″ on both of the short sides. The with the 4-1/2″ side at the top I scored 1/2″. The I crisped up the fold lines with my bone folder. This will become the pocket for the option to hold a couple of recipes.
I placed tear and tape on all the folded sides. I then decided where I wanted my recipe pocket. I took off the release paper from the strip of tear and tape that was on the long side. I adhered it to where I wanted the pocket to sit. Then I removed the release paper from the short sides and adheared it to the board. Thus creating a pocket that opens upward.
I also removed the magnet that was nestled in the base of the metal clip. I the glued the clip to the upper portion of the board so that it eas in the middle and just down from the handle.
With a very old stamp I stamped three 5″ x 7″ pieces of Basic White cardstock. These stamped pieces of Basic White became recipe cards. I did write out a Banana Bread recipe but left the other two blank.
You could glue the magnet on the back of the board iff you wanted to but I did not.
So the cost of the materials was $2.50. I already had the DSP and Basic WQhite cardstock. Of course I also had the glue, tear & tape, dies. This board can be decorated for any occasion and will be a great functional and nice gift.
