
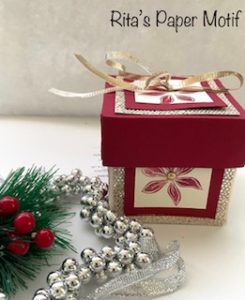
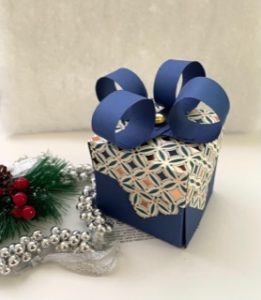
 The small gift boxes called explosion boxes are great for packaging thos small gifts. The baxes are called explosion boxes because when you remove the lid the sides fall down and the gift in the middle is exposed. The idea offers a bit of fun and whimsey.
To make this size of explosion box you will need:
- A 7-1/2″ x 7-1/2″ piece of cardstock is needed for the box. I like to use cardstock rhat has a nice weight to it. I used Thick White cardstock (#159229) for the first box you see and Night of Navy (#100867) for the second box you see.
- A 4-5/8″ x 4-5/8″ piece of cardstock or cordinating Designer Series Paper for the lid.
- If you choose to decorate your box like I did in the first picture above, you will need 5 pieces of coordinating paper that measures 2-1/2″ x 2-1/2″. That allows a square for the 4 sides you will decorate and one for the top of the box.
- If you want to layer on top of these 2-1/2″ squares you will need five 2″x 2″ squares
- On top od the 2″ x 2″ squares I layered ando 1-1/2″ x 1-1/2 square. How may layers you want to add is up to you. You can als use any stamp image you want – if you want.
To make :
- Begin by scoring the 7-1/2″ x 7-1/2″ square at 2-1/2″ on all four sides. The with bone folder (#102300) crisp up all folds created by score lines.
- At the bottom of your scored square cut verticaaly to the horizontal score line that intersects. Cut upward (vertically) on both score lines.
- Turm your 7-1/2″ x 7-1/2″ square 180 degrees and repeat cutting up the score lines.
- If you are going to adhere a sentiment on the inside of the box stamp that image on a 2-3/8″ x 2-3/8 piece of white cardstock and adhere it to the midde square. The turn the 7-1/2″ square over.
- Make sure the side of your square that is at the bottom is the side that you did not cut vertically on the score lines.You can now decorate the three sections at the bottom.. If your decoration is directional, the top part of the decoration should be facing downward. Decorate all three tabs that are facing downward.
- Also decorate the middle tab that is facing upward. Now set the bottom of the box aside.
Lid
- Score the 4-5/8″ x 4-5/8″ square 1″ on all four sides. With bone folder crisp all fold lines.
- Choose a side of the square (that will become your lid) and cut vertically on both score lines of that side.
- Rotate the square 180 degrees and repeat cutting vertically to intersecting horizontal score line.
- You have dreated the four tabs needed to create the lid. If you are goind to decotate the top you should do so now.
- Then place adhesive to tabs and fold inward to create square corners. Repeat until you have a lid shape.
- Allow adhesive to dry if needed.
To fold into box:
- Take the 7-1/5″ square and place it so the three decorated tabs are at the bottom.then pull togeter the middle tab on the right and left hand side and fold up.
- Now fold the top three tabs in so that the tabs on the edge are wrapping around the two middle tabs you have foled in. Then repeat with the three decotated tabs. Now you have created a box.
- Secure the sides of the box by placing the lid on the the box.
- Now if you want to put ribbon on your box you can.
