
 The Drape Fold is also referred to as the Curtain Fold as well as the Acordian Fold. I refer to it as the Drape Fun Fold because it does remind me of how our draperies (window coverings) used to hang framing the windows in a formal living room. However you refer to the fold one thing is for sure, it lends character to any card.
Items and measurements needed for the card.
- A piece of cardstock cut to 4-14″ x11″ ( I used Basic White Cardstck #159276)
- A piece of Designer Series Paper cut to 4-3/4″ x 10″. (Double sided DSP is great just remember that when you fold the other side of the DSP will show.)
- A piece of cardstock cut to 4-1/8″ x 5-3/8″. I used Basic White #159276.
- Piece of cardstock measuring 4″ x 4″. I used Real Red #102482.
- A piece of Basic White Cardstock #159276 that measures 4″ x 5″- for inside of card.
To complete card.
- Place the 4-1/4″ x 11″ piece of cardstock in trimmer with the long side facing upward and score at 5-1/2″ (in half). Fold and crisp the fold with your bone folder #102300.
- Place the 4-3/4″ x 10″ piece of DSP (Designer Series Paper) in your trimmer. With the 4-3/4 side facing upward. (If your DSP is directional make sure the side you want facing upward when card is completed, is facing to the right hand side). Now on the 4-3/4″ side that is facing upward, make a tick mark at 3/4″. Rotate your DSP 180 degrees and make another tick mark at 3/4″. You should now have a tick mark on both of the 4-3/4″ sides. These tick marks should be diagonal from each other.
- Place each tick mard in the groove of the cutting guide. Then cut your DSP. You should have two daigonal pieces.
- With the longest side of the diagonal piece you want to use place ii in your facing upward. Score at 2″, 3″, 5″, 6″, 8″, & 9″.
- Now fold along score lines in an acordian fashion. (The first fold should be a valley fold and second a mountain fold.) This is where I use my bone folder #102300.
- Turn your folded piece of DSP over and at the top of the fold (The straight side) run some adheasive so that you will be able to adhere the DSP to the 4″ x4″ square piece of cardstock.
- Now adhere the folded DSP to the 4″ x4″ piece of crdstock. The straight side of the folded DSP should be flush with the top side of that 4″ x 4″ square. The short straight side of the DSP (should now be on the left hand side) should be adered to the left hand side of the square pece of cardstock.
- Now would be a time to stamp your sentiment to the top of the 4-1/8″ x 5-3/8″ piece of card stock. I used Seasons Greeting” in real red ink #147084.
- Adhere the square 4″ x4″ piece of carstock that the folded DSP is adhere to, to the 4-1/8 x 5-3/8 piece of cardstock. Keep in mind your stamped sentiment.
- You cand soften as well as finish the loo of the card by adhering ribbon or another thin piece fo cardstock over the line that is made where the 4″ x 4″ piece of card stock meets. Which ever you choose to use I recommend you do that now.
- When finished with all of the above adere the finished card layer to the front of the card base.
- You can then adhere your stamped and decorated 4″ x 5″ piece of Basic White cardstock #159276, inside your card.
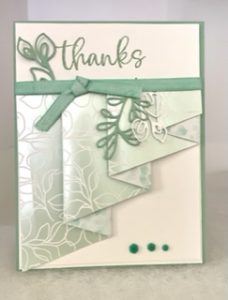
Keep in mind you can change colors and DSP as you wish. This is a card I made chnging the DSP to Splendid Day DSP #159666
You are finished and can now send to the recprient.
