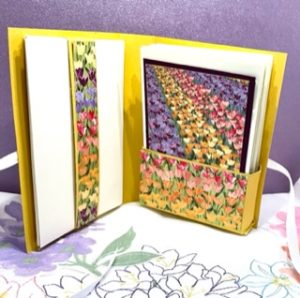
I wanted a way to package my handmade cards so that I could give them as a gift or sell them. As I searched for ideas, I found Ronda Wade’s version of a note card box. She shared the idea so that others could duplicate the box if desired. As you can guess I was all over that. This is what my box looks like.
If you would like to make this box, you will need:
- 2 sheets of 8-1/2″ x 11″ of solid cardstock. I used Bumble Bee (#153077 which is retiring as of 3/31/22) but you can use whatever color you wish.
- 1 sheet of Designer Paper that measures 12″ x 12″. You choose which Designer Paper you want.
- A 2-1/2 x 4″ piece of Basic White card stock (#159270).
- A 3″ x 4-1/2′ piece of coordinating cardstock I used Old Olive (#100702)
- Adhesive of choice. I used Liquid Glue and Tear & Tape.
- 35″ of coordinating ribbon.
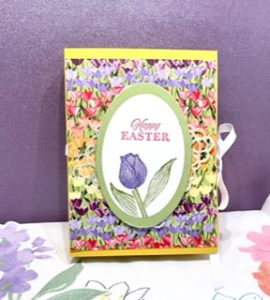
- A stamp set of your choice with the sentiments you want to use. I used Easter Friends (#157737) because I was packaging Easter Cards.
- I also used the Timeless Tulips Stamp set to decorate the oval tag with sentiment.
- scissors
- Trimmer with scoring blade. If your trimmer does not have a scoring blade you will need a scoring board.
- Bone folder.
To make:
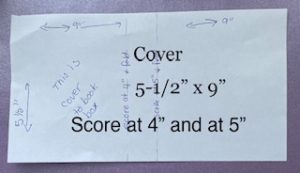
- Take 1 sheet of the card stock (again I used Bumble Bee) and cut 5-1/2′ x 9″. Then with the 9″ side face upward score at 4″ and again at 5″. This makes the cover of the box.
- Fold on the score lines. This will create the cover to your card box.
- Now let’s attach the ribbon. Begin by folding the ribbon in half-length wise. This will give you the midpoint of ribbon. Place the midpoint of the ribbon in the middle of the spine of the card box cover. On the right half of the cover use your adhesive to attach the ribbon to the middle. Then you can adhere the ribbon to the spine and on the left side of the cover.
- Now take a sheet of the solid card stock and cut a 9″ x 11″ strip. This strip is going to be the band that holds the envelopes. With the 1″ side of the strip upward and the other 1″ side facing down, wrap around your six or eight envelopes. Remember the envelopes are note card size. At the place where they overlap place adhesive. This will connect the ends of the strip to create a band to hold your envelopes. After you have created the bad adhere the band to the left side of the inside of the cover. You could decorate with a 1″ x 2-1/4 ” of Designer Paper.

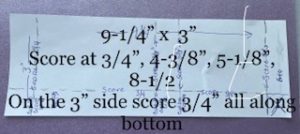
- Now let’s make the box that holds your decorated note cards. To do that cut a piece of solid cardstock that measures 9-1/4″ x 3″. With the 3″ side facing upward score 3/4″. Rotate the piece of card stock so that the 9-1/4′ side is facing up and score at 3/4″, at 4-3/8″, at 5-1/8″ and again at 8-1/2″.
 Fold on the score lines. The 3/4″ score line that runs long wise will become the bottom of the box. Cut along the score lines below that long score line creating tabs. You will find a square on the bottom left-hand side that was created where two score lines intersected. You won’t need that square so cut it out.
- Now fold on the score line just above where you cut out the square and place some adhesive. Then take the opposite end that was scored at 8-1/2″ and adhere it to the side that had adhesive on it.
- Place adhesive on one of the long tabs. With the bottom of the box facing up fold the sides in and the long tab with the adhesive next then the tab with no adhesive onto that tab. This will create the box for the cards.
- Adhere the box to the right side of the inside of the box cover. I suggest you use an adhesive that is strong to withhold the weight of the note cards. I used tear & Tape.
- Now we can decorate the front and back of your book. Cut two pieces of Designer Paper that measures 5″ x 4″. Then adhere a piece to each side of the box.
- You can then add your sentiment. I layered a white oval on a larger oval (Old Olive), but you can use whatever shape and color you want. The add your sentiment. You can embellish as you wish.