
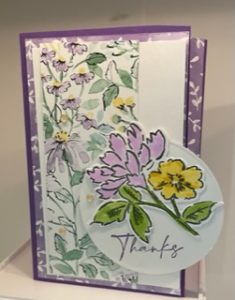
Not only is it polite to thank others when they acknowledge you or lend a hand but, a handmade “Thank You” card shows your appreciation. This card says “Thank You” in a very nice way.
Materials needed to make this card:
- 1 sheet of card stock measuring 8-1/2” x 11”. I used Gorgeous Grape (#146987)
- 1 sheet of Basic White card stock (#159276) measuring 8-1/2” x 11”.
- A piece of 6” x6” Hand-Penned Designer Series Paper (#155499),
- Memento Black Ink pad (#132708)
- Hand-Penned Petals Stamp and Penned Flowers die bundle (#155492)
- Highland Heather, Granny Apple Green, and Daffodil Delight stamping blends or colored pencils to color the image you stamped and die cut.
- Gorgeous Grape (#147099) ink pad. You can use any coordinating color of ink you wish.
- Genial Gems (#155500) or any rhinestones you choose. The enamel dots would also be nice.
- Acrylic blocks for holding your stamps.
- A paper trimmer (#152392) preferably with a scoring blade
- Scissors
- Dimensionals (#104430)
- Your choice of adhesive I used Stampin Seal (#149699)
To continue get all your paper cut:
- Cut the 8-12” x 11” Gorgeous Grape cut to 8-1/2” x 5-1/2”.
- With the 5-1/2” side facing upward score at 4-1/4”. Once you secure the fold you will have a standard A2 size card. Keep in mind the sample I made is a portrait orientation. The fold will face the left as you are looking at it and will open on the right-hand side.
- Then open your card and trim ¾” off the right-hand side of the front of the card
- The while you have the trimmer out cut 1 piece of Basic White to 2-3/8” x 5”. This will be for a layer on outside of the card.
- Cut another piece of the Basic White card stock to 3-1/4” x 5”. This will be the inside panel that is for your inside sentiment and/or personal message.
- Then cut a ¾” strip of the 6” x 6” piece of Designer Series paper.
- Now cut another piece of the Designer Series paper to 3-1/4”x 5-1/4”
- One last cut of the Designer Series paper that would be 2” x 5”
Now let’s stamp.
- With the smaller floral outlined image (from the Hand-Penned stamp set), stamp on a corner of the left-over white card stock. Use the Memento because the sample is colored with the Stampin’ Blends.
- Also, on the left over Basic White cardstock you can stamp your sentiment. Keep in mind that the sentiment will be on a large circle so allow room.
No let’s color the floral image.
- I used the Stampin’ blend markers but if you don’t have the blending markers you can use any alcohol markers or even colored pencils. The colors of the Stampin Blends I used, are listed above.
Now let’s die cut.
- With the largest circle from the layering circles, you will cut a circle that includes the sentiment you previously stamped. If you feel more comfortable cutting the circle out first, then stamping the sentiment by means do it.
- Then with the smaller floral outline die from the Penned Flowers die cut the stamped and colored floral image.
Yay, now to assemble our card.
- With the adhesive adhere the Basic White card stock that goes on the inside of the card (3-1/4” x 5”), on the inside.
- Adhere the ¾” strip of the designer paper on the right-hand of the inside of the card. I chose to use the back side of the Designer Paper so there would be interest.
- Now on the front of the card the first layer to adhere is the 3-1/4”x 5-1/4” of designer Paper. I put my adhesive on the floral side of the Designer paper so that the non-floral side of the paper would be facing outward.
- The adhere the 2-3/8” x 5” of Basic White on the designer paper leaving a slight margin all around.
- Finally adhere the 3-1/4”x 5-1/4” series paper on the basic white cardstock.
- With dimensionals you can adhere the circle you cut and stamped to the lower right side of the front of the card. Be sure to only add dimensionals to the back of the side of the circle that will be on the front of the card. If you place dimensionals to the entire back of the circle you will adhere your card closed.
- You then can adhere the floral image you colored and cut onto the sentiment circle.
- Lastly you can now decorate your card with gems, rhinestones, or enamel dots. I used the Genial Gems.
