
 This card fold is easily created using the Pansy Petal Designer Series Paper (#155807). The designer paper is featured in the Stampin’ Up Annual Catalog May 2021-April 2022. It comes in sheets of 12″x12″ and sells for $11.50. The coordinating colors are Blackberry Bliss, Bumble Bee Calypso Coral, Evening Evergreen, Fresh Freesia, Polished Pink, Pale Papaya, Soft Succulent, and Soft Sea Foam. The Pansy Patch Dies (#155680) offer great assistant in cutting out some of the images on this Designer Paper.
If you would like to recreate you will need the following:
- 1 12″ x 5-1/2″ piece of the designer paper
- Your trimmer (#152392) and/or scoring board (#122334).
- Adhesive I used stamp & Seal (#149699)
- A 2-1/4″ circle or Basic White (# 159276) cardstock
- A 2-1/2″ or even a 3″ circle out of coordinating color to be a layer under white circle. I used my layering circle dies (#151770)
- Pansy images. These can be ones that were die cut from sheet of designer paper or ones you stamped and cut, or ones you made using the Pansy Dies.
- Rhinestones or your choice of embellishment.
- 1 piece of Basic White card stock measuring 4″ x 5″ for inside of card.
- soft lead pencil. I used a mechanical pencil
- ruler
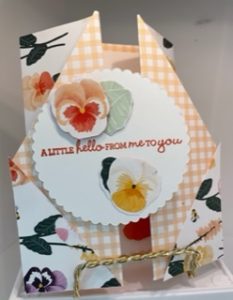
After you gathered all this score the 12″ x 5-1/2″ (pay attention to if the paper is directional or not) at 2″, 4″, 8″, and 10″. Turn your designer paper so that the 12″ side is facing upward. On both the left- and right-hand sides measure from the top downward 2-1/2″ With your pencil make a light pencil mark. The on your trimmer you will be lining up the pencil mark on cutting guide diagonally to the first score line. The with your trimmer cut. This will leave you with two triangles that we will be using.
Then fold at fold lines. First starting on the left-hand side fold (the 2″ score line), should leave the edge facing outward and the folded edge inward. Then at 4″ score line fold toward the inside of the card. Repeat on 8″ and 10″ score lines. Then adhere the two small triangles at the bottom of each side of the card. This should create a diamond shape in the middle of the front of the card.
You can take the 4″ x 5″ piece of white cardstock and stamp your inside sentiment and decorate. (The Pansy Patch stamp set (#154999) has great sentiments to choose from). Then adhere this white cardstock to the inside.
You will next want to stamp your outside sentiment onto the white circle. Then adhere to the bigger layering circle. You can then decorate the circle.
To adhere the decorated circle to card simply put your adhesive to 1/2 of the backside of circle. (This is so you don’t impede the opening of the card.).
This card will fit in a medium envelope.
