
- I used a 8 1/2 x 5 1/2 card base (Bermuda Bay)
- 3 strips (1 1/2 x 4) out of designer paper
- 3 strips of Basic White card stock (slightly larger than 1 1/2 x4 just so there is a small border around strips of designer paper)
- 1 3 inch circle out of Basic White card stock
- 1 circle out of designer paper (I used my 2 inch hole punch)
- a smaller circle out of white cardstock ( I used my 1 1/2 inch circle punch)
- 1 4×5 piece cut out of Basic White- will be for inside the base of the card.
- 1 stamp for outside sentiment. (To fit in small circle. (I used a a stamp from a Paper Pumpkin kit – “Smile”)
- 1 stamp for the inside of the card. (I used “I Thought of you today” from Tranquil Thoughts Stamp set)
- 1 stamp to decorate the white card stock inside card
- Ephemera to decorate card. I used the butterflies from the Butterfly Brilliance DSP)
- Bermuda Bay ink
- memento ink
I scored the Bermuda Bay cardstock 2 1/8 on left side of cards and again on right hand side. Then I folded th side inwards so the met in the middle of the card. Thus creating the gate fold.
I then stamped the 4×5 piece of white card stock with the sentiment “I thought of you today” in Bermuda Bay ink. I also stamped a small flower on a vine in Memento ink. (The flower and vine was also from the Tranquil Thoughts stamp set.) I then glued the white card stock on the inside base of the card thus creating a space for aa message.
I then adhered the each of the 1 1/2 x 4 strips of designer paper onto the white strips of Basic White. creating three strips of designer paper layered on white strips of white card stock. Then I adhered one of the layered strips strips on the top of the left hand panel of card. (Leave a margin on the top. Only apply adhesive to the left side of the strip. This will ensure that the left hand side of the panel will open.) Then adhere another strip on the bottom of the left hand side of the panel again leaving a margin at bottom of card. Make sure the distance between the bottom of the first (top) strip and the bottom strip is not more than 2 3/4 inches.
The position the third strip on the panel on right hand side of card so that it is in the middle of the two other strips. Using your adhesive glue the middle strip on right panel in the middle of the other two stripes. Make sure the adhesive is only on the right of strip. When you close your card you will have 3 strips. Two adhered on the left hand side and 1 strip in the middle adhered to the right panel.
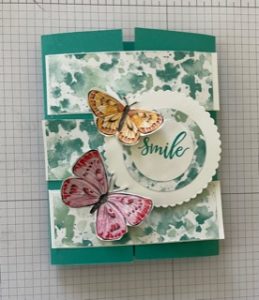
Now adhere the 2 inch circle of designer paper in the middle of the 3 inch circle. Then on the smaller white circle stamp your sentiment. (I stamped “Smile” on mine. using the Bermuda Bay ink.) The adhere the smallest circle on the 2 inch designer paper circle. This will create your tag.
Open with your card open, using dimensionals adhere the top of the tag onto the top strip towards the right of your card. Adhere the bottom of the tag to the bottom strip. You need to keep in mind that the sides of the tag are not adhered to the card. Make sure that the adhesive is not showing on the back side of the card. You only want the top and bottom of the tag adhered.
Then to close the card you are going to slip the strip that was adhered to the right panel through the opening of the left side of tag.
I decorated the front and back of the card with some of the butterflies I cut with the die that came with the Butterfly Brilliance Bundle.
