
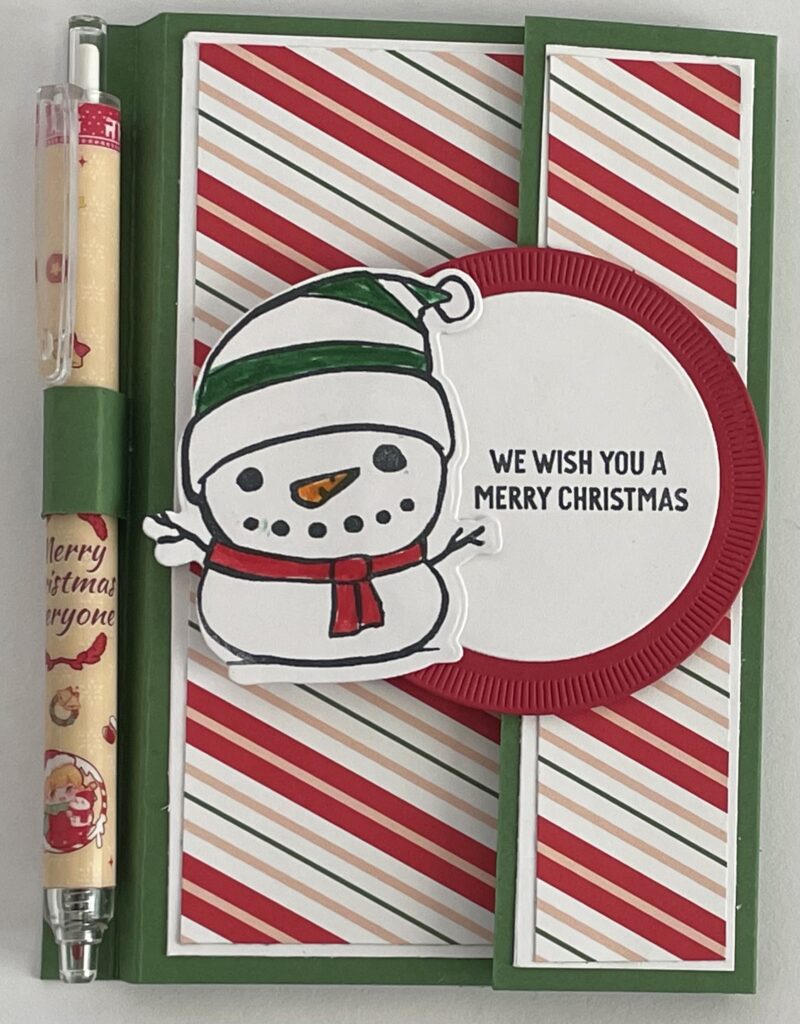
This mini note pad is a great idea to make and give as a Christmas gift. The idea was shared by Julie DiMateo so thanks Julie.
I like the fact that the cardstock and DSP can easily be changed and can become appropriate for the desired occasion.
Stampin” Up Supplies
- A 5-⅝” x10-3/16” piece of Garden Green cardstock. With long side facing upward in paper trimmer score at 1-½”,1-¾”, 5-⅞” flip to back side score at 6-⅜” flip to front side and score at 6-⅝”.
- A 2” x 5-⅝” Garden Green cardstock. With 5-⅜” facing upward score 1” on both sides.
- A ¾” x 1-⅞” piece of Garden Green cardstock. With long side facing upward score at ⅜” on each side.
- A 5-⅜” x 3-5/16” of Basic White cardstock.
- A 5-⅜” x 1-¼” strip of Basic White cardstock
- A 5-¼” x 1-⅛” piece of coordinating Designer Series Paper.
- A 5-¼” x 3-3/16” piece of Designer Series Paper
- A 2-3/4” circle cut out of Real Red
- A 2” circle punched out of Basic White cardstock
- A pen. I got mine from Amazon
- Liquid Multipurpose glue
- Tear & Tape
- A small note pad that measures 3” x 5”- I got mine at WalMart
- Velcro Dots- Got mine from Amazon
- Paper trimmer
- Bone folder
Directions
- Now that the 5-⅝” x 10-3/16” piece of card stock has been scored crisp up the fold line. Be sure when you’re folding on score lines to fold the first three lines to create a mountain fold. Then the fourth score line is folded to create a valley fold. The fifth scoreline is a mountain fold again.
- Place tear & tape on the back of the third fold and adhere to the panel. The flat part that was created will become where the pen will live.
- Fold the score lines on the 2” x 5-⅝” This will become the strip that secures the note pad. The end panels created by the folds can be adhered to inside. The cardboard part of the note pad can be inserted and this will secure the note pad.
- Crisp up the score lines on the ¾” x 1-⅞” strip. This will become what secures the pen.
- Place some glue on one of the folded ends of the ¾” x 1-⅞” strip. Then adhere the loop about a ¼ of the way down on the flat part you have created to the left of the base.
- Adhere the 5-¼” x 3-3/16”” piece of DSP to the 5-⅜” x 3-5/16” piece of Basic White and then onto the front of the mini notepad.
- Adhere the 1-⅛” x 5-¼” strip of DSP to the 5-⅜” x 1-¼” strip of Basic White. Then on to the narrow part that is the securing panel.
- Then stamp your sentiment on the Basic White 2” circle.
- Adhere the white circle onto the 2-¾” circle.
- Turn the Bigger circle over and apply glue to the far right.
- Adhere a velcro circle to the left of that same circle the flip back over and the glued part of the circle will adhere the circle to the more narrow panel and the velcro dot will become the closure.
![]()
Here is the mini note pad in a different color.
Or better yet watch the how to video
